
Deep Dive into LlamaIndex Workflow: Event-driven LLM architecture
What I think about the progress and shortcomings after practice


Recently, LlamaIndex introduced a new feature called Workflow in one of its versions, providing event-driven and logic decoupling capabilities for LLM applications.
In today's article, we'll take a deep dive into this feature through a practical mini-project, exploring what's new and still lacking. Let's get started.
Introduction
Why event-driven?
More and more LLM applications are shifting towards intelligent agent architectures, expecting LLMs to meet user requests through calling different APIs or multiple iterative calls.
This shift, however, brings a problem: as agent applications make more API calls, program responses slow down and code logic becomes more complex.
A typical example is ReActAgent, which involves steps like Thought, Action, Observation, and Final Answer, requiring at least three LLM calls and one tool call. If loops are needed, there will be even more I/O calls.

Is there a way to optimize this?
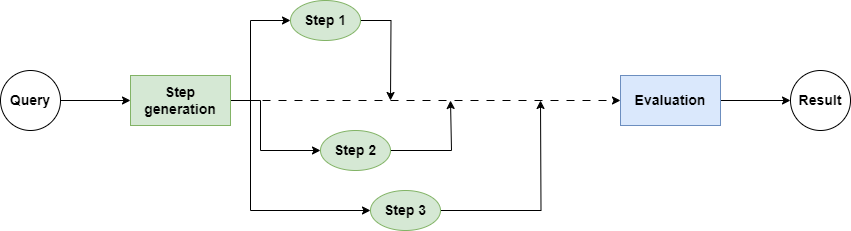
As shown in the diagram above, in a traditional programming model, all I/O calls are linear; the next task must wait until the previous one is completed.
Although mainstream LLMs now support result generation via stream output, in agent applications, we still need to wait for the LLM to finish generating results before returning or moving to the next phase.
Actually, we don’t need all I/O calls to proceed sequentially; they can be executed concurrently, as shown in the diagram below:
Does this diagram look familiar? Yes, Python's asyncio package provides the ability to execute I/O-bound tasks concurrently, and nearly all I/O-based APIs, including LLM clients, support concurrent execution.
LlamaIndex's Workflow also utilizes the principles of concurrent programming. It goes further by not only encapsulating the details of the asyncio library but also providing an event mechanism that allows us to decouple different segments of the business process.
Now that we understand the background, let's step through LlamaIndex Workflow with an actual project.
First Impressions
Before the main course, let's have an appetizer by familiarizing ourselves with the elements and basic principles through a simple code example.
Importing necessary packages
First, we need to import the necessary tools. Workflow is already included in the latest version of LlamaIndex, no separate installation is needed.
from llama_index.core.workflow import (
    Event,
    StartEvent,
    StopEvent,
    Workflow,
    Context,
    step,
)
Defining some events
Since Workflow is an event-driven framework, we should start by defining some events.
To avoid inconsistencies, we can first define a BaseEvent, ensuring all events use the key payload for message passing.
class BaseEvent(Event):
    payload: str | dict | None
Let’s define our first event of the day: SecondStepEvent
class SecondStepEvent(BaseEvent):
    ...
Starting simple
Next, let’s start coding our first Workflow program, which is a subclass of Workflow containing two methods:
class SimpleWorkflow(Workflow):
    @step
    async def start(self, ev: StartEvent) -> SecondStepEvent:
        return SecondStepEvent(payload=ev.payload)

    @step
    async def second_step(self, ev: SecondStepEvent) -> StopEvent:
return StopEvent(result=ev.payload)- The method
startaccepts aStartEventand then returns aSecondStepEvent. - The method
second_stepaccepts aSecondStepEventand then returns aStopEvent.
Let's get the code up and running to see how it works.
s_wf = SimpleWorkflow(timeout=10, verbose=True)
result = await s_wf.run(payload="hello world")
print(result)
We have turned on the verbose option so that we can see in detail how the code is executed.

Trying out the visualization tool
LlamaIndex also generously provides a small tool that allows us to see the entire workflow process, which is very intuitive.
from llama_index.utils.workflow import draw_all_possible_flows

draw_all_possible_flows(SimpleWorkflow, filename="simple_workflow.html")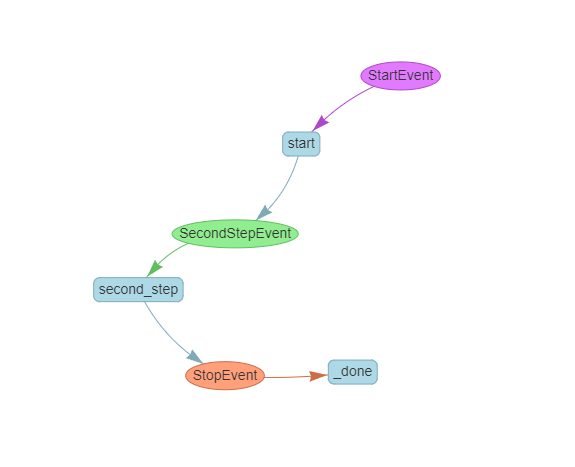
Explaining the principles
A quick look at the source code reveals that Workflow internally maintains a Context, which not only keeps an event queue but also maintains a dictionary containing each step.

When Workflow is initialized, the step decorator analyzes the signature of each method to determine which events it will receive and return, starting to listen to the event queue, and then storing this method in the step dictionary.
When the Workflow's run method is launched, it starts a runflow loop, initially placing a StartEvent in the event queue. If there's a method that accepts this StartEvent, it starts executing and returns the corresponding event, putting it back into the event queue.
The step method can also directly call the Context's send_event method to place an event in the queue.
If the runflow loop detects a StopEvent in the queue, it exits the flow and returns the final result.
With a basic understanding of the elements and implementation principles, we can now explore the advantages and shortcomings of the Workflow through a hands-on project.
Hands-on Project
In today's hands-on project, we'll step by step implement an automated trading robot that listens to market sentiment and executes stock trades, demonstrating Workflow's branching and looping control, Streaming events, and concurrent execution features.
Note: The following code uses pseudocode to explain the Workflow mechanism and does not contain any trading logic or investment advice.
If you're interested in learning more about the complete LlamaIndex workflow, check out this tutorial I wrote:

Branching and looping control
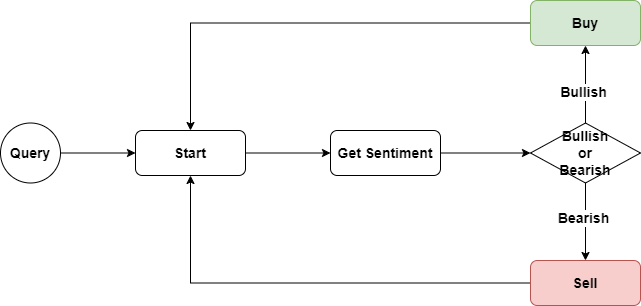
In the first version of the trading robot, we'll continuously monitor the latest news of a certain stock, analyze the sentiment implied in the news, and then make corresponding trades.
The entire code logic is shown in the diagram below:
First, we'll define a Trading class that uses async to implement the buy and sell methods.
class StockTrader:
    async def buy(self, stock: str) -> None:
        await asyncio.sleep(0.5)
        print(f"Buying {stock}")

    async def sell(self, stock: str) -> None:
        await asyncio.sleep(0.5)
        print(f"Selling {stock}")
We also need to implement four events: LoopEvent, GetSentimentEvent, BuyEvent, and SellEvent, all of which are subclasses of BaseEvent, ensuring they follow a unified message-passing interface.
class LoopEvent(BaseEvent):
    ...

class GetSentimentEvent(BaseEvent):
    ...

class BuyEvent(BaseEvent):
    ...

class SellEvent(BaseEvent):
    ...
Next, we start implementing the TradeMonitorWorkflow class, which contains the core business logic.
class TradeMonitorWorkflow(Workflow):
    def __init__(self, total_cycle: int = 1, *args, **kwargs) -> None:
        self.total_cycle = total_cycle
        self.counter = 0
        self.trader = StockTrader()
        super().__init__(*args, **kwargs)

    @step
    async def begin(self, ev: StartEvent | LoopEvent) \
            -> GetSentimentEvent | StopEvent:
        print("We now return to the begin step")
        if isinstance(ev, StartEvent):
            self.stock = ev.payload

        if self.counter < self.total_cycle:
            await asyncio.sleep(3)
            self.counter += 1
            return GetSentimentEvent(payload=self.stock)
        else:
            return StopEvent(result="We're done for the day.")

    @step
    async def get_sentiment(self, ev: GetSentimentEvent) -> BuyEvent | SellEvent:
        print(f"Wil get the latest sentiment for stock {ev.payload}")
        if random.random() < 0.3:
            return SellEvent(payload='Bearish')
        else:
            return BuyEvent(payload='Bullish')

    @step
    async def buy(self, ev: BuyEvent) -> LoopEvent:
        print(f"We now buy some stock with sentiment {ev.payload}.")
        await self.trader.buy(self.stock)
        return LoopEvent(payload="Start a new cycle.")

    @step
    async def sell(self, ev: SellEvent) -> LoopEvent:
        print(f"We now sell some stock with sentiment {ev.payload}")
        await self.trader.sell(self.stock)
return LoopEvent(payload="Start a new cycle.")- The
beginmethod is our entry point, acceptingStartEventandLoopEvent. - The
StartEventis the default event that starts the code, and we pass the stock code through this event. - The
GetSentimentEventtriggers theget_sentimentmethod to obtain sentiment information. For simplicity, we use therandommethod to generate two sentiments,BullishandBearish, and then return the correspondingBuyEventorSellEventbased on the sentiment. - After a transaction is completed, the
LoopEventreinitiates thebeginmethod for a new round of looping. To simplify the code, we set only one loop. - In each loop, the
beginmethod returns aGetSentimentEventto trigger the acquisition of the latest stock sentiment. If all loops are completed, it returns aStopEvent. - When a
BuyEventorSellEventis received, the correspondingstepmethod executes the transaction based on the sentiment flag in the message body and returns aLoopEventto start a new loop.
As you can see, by using events, we can decouple complex loops and branching processes, making it possible for corresponding events to trigger new loops.
Let's use the draw_all_possible_flows tool to see if the entire flow chart matches our designed business logic diagram.
draw_all_possible_flows(TradeMonitorWorkflow, filename="trade_monitor_workflow.html")
Is that all? If it's just about decoupling loops and branching processes, couldn't I achieve that with some coding tricks?
Yes, but flow control is just the most superficial layer. Next, let's experience the powerful potential unleashed by combining asyncio with Workflow.
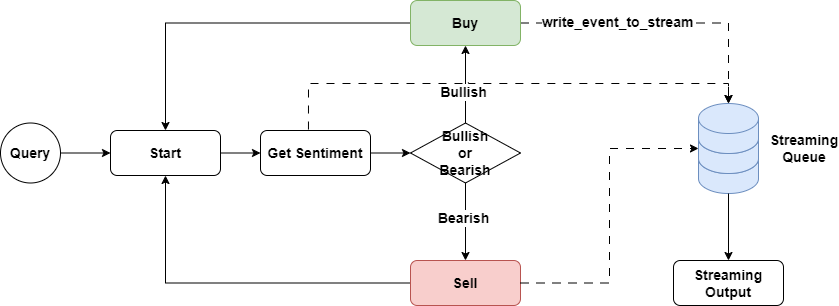
Streaming events
When building an agent chain, one of the most headache-inducing issues is how to feed back messages during the execution process to users, helping them understand the progress of code execution.
In the code above, we use the print method to print progress in real-time on the console, but this approach is not feasible for a web applications.
One solution is to launch a separate pipeline to push messages to users in real-time, but when multiple steps are executed concurrently, how to handle this pipeline becomes a challenge.
Fortunately, the Workflow's Context directly provides a message streaming pipeline, and we can conveniently write messages into this pipeline and handle them uniformly at the calling end through an async for loop.
Let's modify our previous trading program:
💡 Unlock Full Access for Free!
Subscribe now to read this article and get instant access to all exclusive member content + join our data science community discussions.
class ProgressEvent(BaseEvent):
    ...

class TradeMonitorWorkflowV2(Workflow):
    def __init__(self, total_cycle: int = 1, *args, **kwargs) -> None:
        self.total_cycle = total_cycle
        self.counter = 0
        self.trader = StockTrader()
        super().__init__(*args, **kwargs)

    @step
    async def begin(self, ctx: Context,
                    ev: StartEvent | LoopEvent) \
            -> GetSentimentEvent | StopEvent:
        ctx.write_event_to_stream(
            ProgressEvent(payload="We now return to the begin step")
        )
        ...

    @step
    async def get_sentiment(self, ctx: Context,
                            ev: GetSentimentEvent) -> BuyEvent | SellEvent:
        ctx.write_event_to_stream(
            ProgressEvent(payload=f"Wil get the latest sentiment for stock {ev.payload}")
        )
        ...

    @step
    async def buy(self, ctx: Context,
                  ev: BuyEvent) -> LoopEvent:
        ctx.write_event_to_stream(
            ProgressEvent(payload=f"We now buy some stock with sentiment {ev.payload}.")
        )
        ...

    @step
    async def sell(self, ctx: Context,
                   ev: SellEvent) -> LoopEvent:
        ctx.write_event_to_stream(
            ProgressEvent(payload=f"We now sell some stock with sentiment {ev.payload}")
        )
        ...
In the first step, we pass a Context type parameter in the signature of the step method. This lets Workflow know to pass the current execution context into the step method.
Then, we replace the print method with the ctx.write_event_to_stream method to write messages into the pipeline in real-time.
Finally, before waiting for the final result, we use the stream_events method to iterate over the latest messages from the message pipeline.
from datetime import datetime

def streaming_log(message: str) -> None:
    current_time = datetime.now().strftime("%H:%M:%S")
    print(f"{current_time} {message}")

trade_monitor_v2 = TradeMonitorWorkflowV2(timeout=10, verbose=False)
handler = trade_monitor_v2.run(payload="[Stock Code]")

async for event in handler.stream_events():
    if isinstance(event , ProgressEvent):
        streaming_log(event.payload)

final_result = await handler
print("Final result: ", final_result)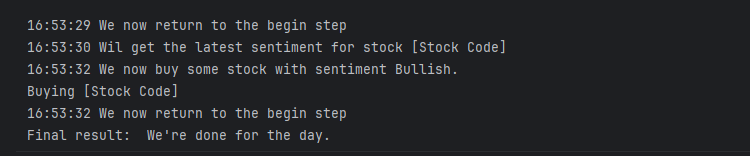
Concurrent execution
As mentioned at the beginning of the article, for I/O-bound tasks, we can use the asyncio package to make the code execute concurrently, greatly improving the running efficiency. Workflow implements this mechanism for us, encapsulating the asyncio execution code, and letting us focus on the code logic.
Let's explain using the TradeMonitor project as an example.

This time, we'll upgrade the project, allowing the TradeMonitor to judge whether it's Bullish or Bearish not through one source but simultaneously through wallstreetjournal, wallstreetbets, and a machine learning trending predictor.
First, we add six events: WSBEvent, WSBSentimentEvent, WSJEvent, WSJSentimentEvent, TrendingPredictionEvent, and PredictionResultEvent.
from collections import Counter

class WSBEvent(BaseEvent):
    ...

class WSBSentimentEvent(BaseEvent):
    ...

class WSJEvent(BaseEvent):
    ...

class WSJSentimentEvent(BaseEvent):
    ...

class TrendingPredictionEvent(BaseEvent):
    ...

class PredictionResultEvent(BaseEvent):
    ...

class TradeEvent(BaseEvent):
    ...
Then, we write a ComplexTradeMonitor class as a new Workflow.
class ComplexTradeMonitor(Workflow):
    def __init__(self, *args, **kwargs):
        self.trader = StockTrader()
        super().__init__(*args, **kwargs)

    @step
    async def start(self, ctx: Context, ev: StartEvent) \
            -> WSBEvent | WSJEvent | TrendingPredictionEvent:
        self.stock = ev.payload

        ctx.send_event(WSBEvent(payload=ev.payload))
        ctx.send_event(WSJEvent(payload=ev.payload))
        ctx.send_event(TrendingPredictionEvent(payload=ev.payload))

    @step
    async def wsb_sentiment(self, ev: WSBEvent) -> WSBSentimentEvent:
        await asyncio.sleep(random.randint(1, 3))
        if random.random() < 0.3:
            return WSBSentimentEvent(payload='Bearish')
        else:
            return WSBSentimentEvent(payload='Bullish')

    @step
    async def wsj_sentiment(self, ev: WSJEvent) -> WSJSentimentEvent:
        await asyncio.sleep(random.randint(1, 3))
        if random.random() < 0.3:
            return WSJSentimentEvent(payload='Bearish')
        else:
            return WSJSentimentEvent(payload='Bullish')

    @step
    async def trending_predict(self, ev: TrendingPredictionEvent) -> PredictionResultEvent:
        await asyncio.sleep(random.randint(1, 3))
        if random.random() < 0.3:
            return PredictionResultEvent(payload='Bearish')
        else:
            return PredictionResultEvent(payload='Bullish')

    @step
    async def trading_decision(self, ctx: Context,
                               ev: WSBSentimentEvent | WSJSentimentEvent | PredictionResultEvent)\
        -> TradeEvent:
        results = ctx.collect_events(ev,
            [WSBSentimentEvent, WSJSentimentEvent, PredictionResultEvent])
        if results is not None:
            voting = dict(Counter([ev.payload for ev in results]))
            print(voting)
            sentiment = max(voting, key=voting.get)
            return TradeEvent(payload=sentiment)

    @step
    async def trade(self, ev: TradeEvent) -> StopEvent:
        sentiment = ev.payload
        match sentiment:
            case 'Bullish':
                await self.trader.buy(stock=self.stock)
            case 'Bearish':
                await self.trader.sell(stock=self.stock)
            case _:
                print("Do nothing")
        return StopEvent(result='We are done for the day.')
In the start method, we use ctx.send_event to simultaneously throw out WSBEvent, WSJEvent, and TrendingPredictionEvent. Since Workflow determines which messages were thrown out based on the typing annotation of the step method, we still need to mark the returned message types.
Next, we implement the wsb_sentiment, wsj_sentiment, and trending_predict methods to obtain trading signals and return the corresponding events.
We still use the random method to simulate market sentiment analysis.
As content from different sources requires different parsing times, we hope to wait until all messages return before making a trading decision. At this point, we can use the ctx.collect_events method in the trading_decision method.
Each time a new sentiment event returns, the trading_events method executes once.
But the ctx.collect_events method takes all the events we need to wait for as parameters, and its return value remains empty until all sentiment events return. At that point, the return value is a list of three sentiment events.
We can use the Counter method to count how many times Bullish and Bearish appear, then take the most voted mark to make a trading decision.
Finally, let's use the draw_all_possible_flows tool to see how cool our newly designed workflow is:
draw_all_possible_flows(ComplexTradeMonitor, filename='complex_trade_monitor.html')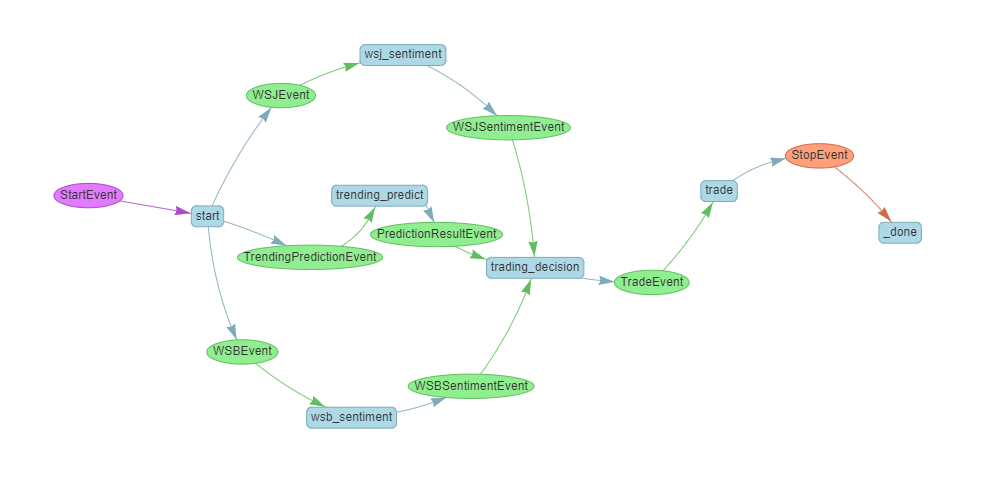
Next, let's execute this workflow and see.
trade_monitor = ComplexTradeMonitor(timeout=20, verbose=True)
result = await trade_monitor.run(payload='[Stock Code]')
print(result)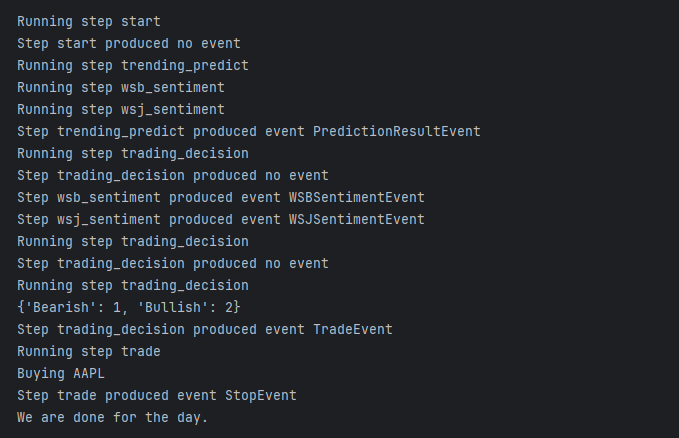
We can observe that the three methods to obtain sentiment from different sources are triggered simultaneously but return at different times.
The first two returned events can trigger the trading_decision method, but cannot continue to trigger the TradeEvent. Only after all three events return and the final trading decision is calculated, is the TradeEvent triggered.
As you can see, with the power of Workflow, we can indeed make our code architecture both clear and efficient.
But don't be too optimistic, because after some time in practice, I think there are still some shortcomings.
Time to Talk about Shortcomings
If you review our previous code, you'll notice that all our code logic is written in the same Workflow, which is fine for simple applications but a disaster for complex real-world applications.
Ideally, we should split different logic into Workflows to maintain the purity of the "single responsibility" principle. The official solution to this requirement is nested workflows:
Nested workflows
Suppose we want to split the trading order logic from the TradeMonitor into an independent Workflow. How should we call it when we need to place an order?
The official solution is a nested workflows, i.e., passing another workflow B as a parameter in the step method of workflow A. Then, after workflow A is instantiated, add the instance of workflow B. As shown in the following code:
class TradeStation(Workflow):
    def __init__(self, *args, **kwargs):
        self.trader = StockTrader()
        super().__init__(*args, **kwargs)

    @step
    async def trade(self, ev: StartEvent) -> StopEvent:
        print("We are now in a new workflow named TradeStation")
        sentiment = ev.sentiment
        match sentiment:
            case 'Bullish':
                await self.trader.buy(stock=ev.stock)
            case 'Bearish':
                await self.trader.sell(stock=ev.stock)
        return StopEvent(result="Done!")


class ComplexTradeMonitorV2(ComplexTradeMonitor):
    @step
    async def trade(self, ev: TradeEvent, trade_station: TradeStation) -> StopEvent:
        sentiment = ev.payload
        await trade_station.run(sentiment=sentiment, stock=self.stock)
        return StopEvent(result='We are done for the day.')
trade_monitor_v2 = ComplexTradeMonitorV2(timeout=20, verbose=False)
trade_monitor_v2.add_workflows(
trade_station=TradeStation(timeout=10, verbose=True)
)
result = await trade_monitor_v2.run(payload='[Stock Code]')
print(result)Wait a minute, if you have Java development experience, will you be surprised to see this code: isn't this dependency injection?
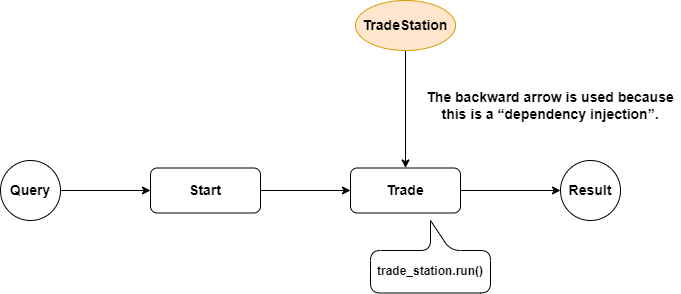
It's indeed similar to dependency injection, but the difference is that we still need to explicitly add the specific workflow instance after the instance is initialized, so there is still coupling, which is the first problem.
Another problem I found during coding is that for nested workflows, I can only call them through the run method, not by calling the corresponding step method in the nested workflow from an external workflow.
Therefore, this is not a good solution for communication between workflows.
Communicate between Workflows
So, is there any way to truly achieve communication between workflows?
I searched the API documentation and couldn't find an official solution, and I noticed that this issue also went unanswered. So I decided to try it myself to see if I could solve it.
After reviewing the source code again, I think the ctx.send_event method has some potential, so the first thing I thought of was whether sharing the same Context between two workflows could solve it?
I noticed that instantiating Context requires passing in a workflow instance and setting a workflow's own Context can be done by passing it in during the run method.
So the code is as follows, keeping the two workflows unchanged, only that the step method in the TradeStation no longer accepts a StartEvent but a specific TradeEventV2.
class TradeEventV2(Event):
    sentiment: str
    stock: str

class TradeStation(Workflow):
    def __init__(self, *args, **kwargs):
        self.trader = StockTrader()
        super().__init__(*args, **kwargs)

    @step
    async def trade(self, ev: TradeEventV2) -> StopEvent:
        print("We are now in a new workflow named TradeStation")
        sentiment = ev.sentiment
        match sentiment:
            case 'Bullish':
                await self.trader.buy(stock=ev.stock)
            case 'Bearish':
                await self.trader.sell(stock=ev.stock)
        return StopEvent(result="Done!")
Then I use the TradeStation to create a Context instance and pass it into the TradeMonitor instance during the run method execution, and sure enough, it throws an error:
trade_monitor_v3 = ComplexTradeMonitorV3(timeout=20, verbose=False, disable_validation=False)
trade_station = TradeStation(timeout=10, verbose=True)
result = await trade_monitor_v3.run(ctx=Context(workflow=trade_station),
                           payload='[Stock Code]')
print(result)
It seems there is a problem with the method signature validation, let's try turning off the validation:
trade_monitor_v3 = ComplexTradeMonitorV3(timeout=20, verbose=False, disable_validation=True)
trade_station = TradeStation(timeout=10, verbose=True)
result = await trade_monitor_v3.run(ctx=Context(workflow=trade_station),
                           payload='[Stock Code]')
print(result)
Still no luck, it seems this way won't work.

Unbound syntax
Then, I noticed that the documentation mentioned a kind of Unbound syntax, which seems to be able to decouple each step's logic from the Workflow. The example code is as follows:
class TestWorkflow(Workflow):
    ...

@step(workflow=TestWorkflow)
def some_step(ev: StartEvent) -> StopEvent:
    return StopEvent()
Although we can still only run within one Workflow, it made me feel the feasibility of communication between modules.
Due to the length of the article, I won't use code to explain here, let me show you a diagram of how to use Unbound syntax for module communication:

As shown in the diagram: First, we can define an Application class as a Workflow pipeline, and simultaneously define the required events.
Then, each project team can write their own business logic code and use different step methods to listen and send messages externally.
Finally, we can call the run method of the Application in the fastapi API to mobilize various modules to complete the task.
In this way, business logic can be split into different modules for development, and then different step methods can be called using events.
This indeed achieves the purpose of logic decoupling. However since this method only registers each step to the Workflow in the step decorator through the add_step method, it still does not achieve real communication between Workflows.
Summary
The new feature of LlamaIndex's Workflow, makes parallel execution of RAG, LLM generation, and I/O calls a very simple task, and the event-driven architecture also allows the program to decouple from complex logic control.
In today's article, I demonstrated several features of Workflow through a TradeMonitor project.
In project practice, we also found that Workflow still has shortcomings in communication between modules, and we discussed different solutions including nested workflows and unbound syntax.
Finally, as agent frameworks like Langchain and AutoGen start to propose their own event-driven architectures, I believe Workflow is on the right path and will see long-term development. Let's keep an eye on it.
Next, we will discuss how to use the LlamaIndex Workflow to achieve agent handoff capabilities similar to OpenAI Swarm:

Still feeling confused about how to use Workflow? No worries, LlamaIndex introduced AgentWorkflow in early '25. It's the super-evolved version of Workflow—simple, easy to learn, and almost perfect: